|
|
|
[ Digital
Jury Services Overview ] [ Image FAQ ] [
Seminars ] |
| |
|
How to prepare your images
for the ZAPP digital jury system* |
|
*Recently
new image specifications have been added to the ZAPP web site. The new size they are specifying will put
artists at a disadvantage in the jury room. DO NOT FOLLOW THE NEW
INSTRUCTIONS. The original ZAPP size of 1920x1920 pixels with
rectangular images masked in black will always present the best (and
properly sized) images to the jurors. Especially since you'd be
competing against over 500,000 properly prepared images already in the
system.
Read the last paragraph of my
review of the 2010 Cherry Creek jury
and call me if you have any questions. 412-401-8100 |
|

How to prepare your images for the ZAPP digital jury system used by shows
like Cherry Creek, Columbus, Ann Arbor, Lakefront, Uptown, Bayou City, St.
James Court, Fort Worth, ArtiGras. the ACC shows, and La Quinta. OVER 300 SHOWS AND COUNTING. |
|
|
|
Read my instructions for
preparing images for Juried Art Services |
|
Also print out the Elements workflow
from the seminar page.
Between the two, they give a fuller picture of what is possible |
|
If you find this
information helpful,
consider giving a small
donation to the web site |
|
|
| Image requirements for the ZAPP art show
jury projection system is a high resolution baseline JPEG sized 1920 x1920
pixels at 72 PPI (pixels per inch. and a file size of not more than 1.8 megabytes. To prepare your images properly,
all work in your image editing program should be done while working on the
images in an uncompressed format like TIF. In the following steps we'll walk you through the preparation and resizing to end up at the required
size. |
| I
firmly believe that nothing is as important as the images you submit for
jurying, whether it be 35mm slides or carefully prepared digital files. |
|
A paper on the
pros and cons of doing your own digital editing |
| The Workflow |
| 1 - First we opened the camera
original and immediately saved it as an uncompressed TIF. You never want
to work directly on a JPEG file, because every time a JPEG file is
resaved, it looses quality. Only save your image as a JPEG as the very
last step before you send it to the show. We then worked on our image at full resolution until
it looked as close as possible to the original. Then
we
resized it to 1920 pixels long dimension at 72 pixels per inch (see
Photoshop's image size box below). We
then saved the file under a new name so as not to overwrite the original full
size image. |
| In reference to the term "working"
on it. All digital image files need some post processing. Even those
taken by professional photographers need to be post processed to look
exactly like the original. In most cases that might mean adjusting for accurate color and
exposure, and correcting for anything that might have been set incorrectly
in camera at the time of exposure. This is where the magic happens
and all creative decisions are made. The rest of the work flow is
straight forward except for the amount of compression needed for the
target file size, which is dependent on the amount of detail in the image.
I show many before and after examples at
the seminars I'm offering. |
| In the seminars, I’ve suggested a workflow
and have given visual examples that focuses on using Levels (under
Image>Adjust) to set a black and white point which gives the image proper
contrast. Using the outer sliders in the Histogram, move them slightly
towards the center where to where the actual data starts. Because it’s a
real time preview, you’ll see the contrast in the image change as you move
the sliders. The second important tool is Hue and Saturation (under
Image>Adjust). You can increase the saturation of the overall image or
choose an individual color to focus your adjustment on. After you’re
satisfied that the image looks like the original art, save as the full
size original in an uncompressed format, like PSD (Photoshop file) or TIF.
That will become the master to which you will go back to make future
changes as needed. All future saves will require you to modify the file
name so you don’t overwrite this full size version. |
| If you’re working in Photoshop
Elements, I have a detail workflow for download on the
seminar information page. |
|
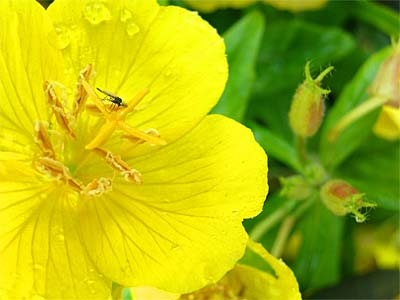
Original photo resized in Photoshop
to the long pixel dimension of 1920 at 72 PPI
as you can see in the image size box below |
|
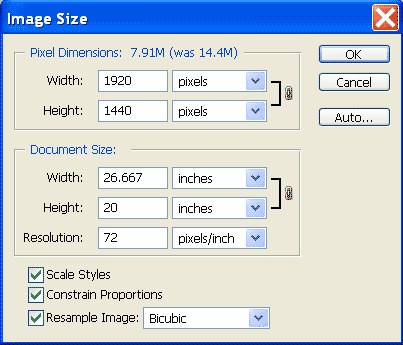
Photoshop's Image Size dialogue for the above photo
Look at width (long pixel dimension), height and resolution
Make sure Constrain Proportions is checked
so the image is sized proportionally |
| 2 - We next added BLACK BORDERS
to our image to make the final size 1920 pixels square. If you are using Photoshop or Elements, make sure that black is
specified in the Canvas Size dialogue box. This will insure that when projected, only the image will be seen by the
jurors. This same example applies to a vertical image also. The only
difference would be the black borders on the left and right, compared to
the top and bottom in the image below. |
|
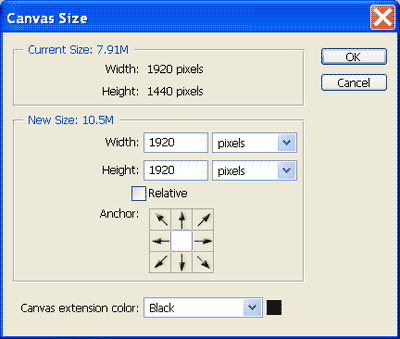
Photoshop Canvas Size Box
Make sure the Canvas extension color is black
|
|
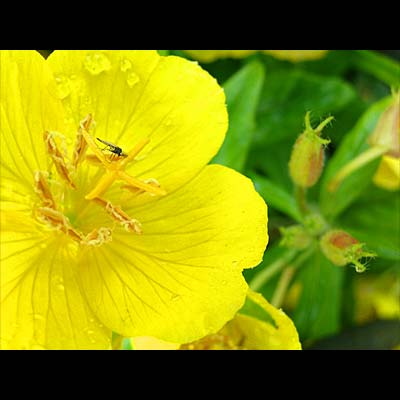
The resulting picture after adding black canvas |
| 3 - Convert to sRGB if
you're not already working in that color space. This will guaranty that
your images are seen by others as you see them to the extent that both you
and the person viewing them are using a color managed system. At least
you're doing the best you can. Since the images will be viewed through a
projected LCD system, the default color space would be sRGB. Digital
cameras capture and output in sRGB by default. Most working professionals
use Adobe RGB as their working space so the file might need to be
converted. I work in Adobe RGB so I would "Convert To Profile" and choose
sRGB under the Image>Mode menu. Some graphics programs do not support
color spaces, so I wouldn't worry about if it's not an option for you. |
| 4 - Sharpen the image
layer using Unsharp Mask. The amount of sharpening you give your image is
relative to the amount of fine detail so I can't really give you any
suggestions here other than to experiment. View the image at 100% in your
editing program and make adjustments in the Unsharp Mask setting turning
on and off the preview. When it reaches a point where you can just see the
difference, that would look better than no sharpening at all. |
| What is Unsharp Mask
and why not just sharpen? When an image is resized (resampled), it
looses sharpness and Unsharp Mask can bring it back so it looks natural
again. The sharpen tool is like sharpening with a sledge hammer while the Unsharp Mask finds the edges where different tones meet and increases the
contrast. The effect is much more subtle which is desirable. If an
image looks like it has been sharpened, it looks unnatural. What I do when using any sharpening tools is to
duplicate the image layer and add the Unsharp Mask to the duplicate layer.
Then using transparency, I can gradually decrease the amount of sharpness
the image has until it looks natural viewed at 100%. Always work with sharpening tools
after resizing to the final size the
image will be used at. That would be 1920x1920 for the images to submit to
ZAPP. And always view the image at 100% on your monitor when making
sharpening decisions. |
|
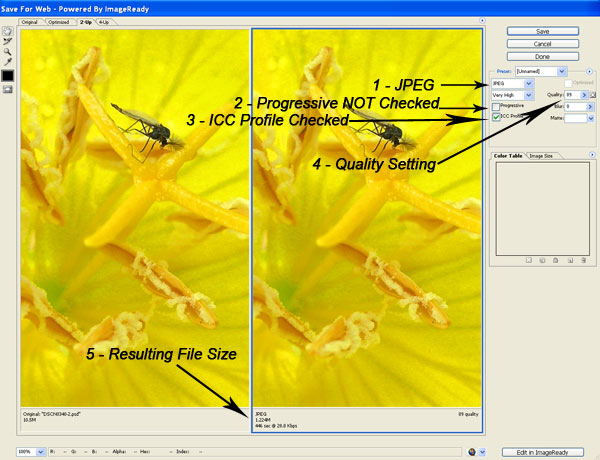
Two Up View of "Save For Web" dialogue box
You can see where I've added arrows to point out the four most important
settings, 1- file format (JPEG), 2- Progressive NOT checked, 3- ICC
Profile (sRGB) checked, 4- Quality
setting, 5-Resulting file size
|
| 5 - ZAPP is looking
for a target file size of under 1.8 megabytes. Using Photoshop's (and
Photoshop Elements) "Save For Web" filter under the file menu, you
can get a properly compressed Jpeg very close to the target file size
through a simple trial and error process. Set Save For Web to show two
views. It installs as a single view by default. Two views will give you a
side by side comparison of the original and the compressed Jpeg so you can
see real time what your image looks like as you change the compression
percentage (quality) compared to the original. Save For Web offers 100
levels of JPEG compression so a more accurate choice can be made as to
which gives the closest results but just under the target file size. You
can do something similar using "Save As" (under the File menu), and save
it as a Jpeg with a quality setting of approximately 10 or 11 out of 12.
But you won't know what the resulting file size will be until after saving
so I recommend adding the level of compression to the file name during the
Save As process. That way you'll be able to compare file sizes afterwards.
This method is also recommended for any graphics programs that don't give
you a real time preview. Do not save the JPEG as progressive. The
Roku only reads baseline JPEGs. In the Save For Web dialogue, make
sure the Progressive box isn't checked. If you use "Save As", make sure
Baseline is checked as the format option for JPEG. |
 | Summery of Workflow
 | Convert to an uncompressed file like TIF |
| Do your image editing |
| Resize to 1920 pixels long dimension at 72 PPI |
| Add 1920 square black canvas |
| Convert to sRGB |
| Sharpen with Unsharp Mask |
| Save as a Jpeg at not more than 1.8 megabytes |
| If you save with a new name at each step you'll be
able to go back and easily make changes if necessary |
|
|
If you're in a MAC and
relatively new to digital imaging, make sure to save your JPEGs with the
three letter file extension so it can be read by ZAPP.
For example "image.jpg". |
| This workflow is also
applicable to other image editing programs, like those we've listed below.
Even PaintShop Pro offers a side by side comparison of the
compressed Jpeg to the original. Most professionals use Photoshop.
Elements (under $100) will do everything you need to prepare your images
and is highly recommended. The interface is similar enough to Photoshop
that you can easily obtain help. |
| Resources |
|
Photoshop
(WIN and MAC) $600
| The standard in the industry. But most of the
features are unnecessary for working on jury slides. That's why I
recommend purchasing Photoshop Elements. |
|
|
Photoshop Elements
(WIN and MAC) $99 Version 6 is out
and it includes a conversion to the sRGB color space |
| PaintShop Pro
(Windows Only) |
| PhotoImpact
(WIN only) |
|
ACDSee
(WIN and MAC)
| An image viewing program so you can see your
images on your own computer. I use it as an image viewer, not an
editor though it has some editing capabilities. I use ACDSee for a
slide show in my seminars |
|
| Irfanview
(Win only)
| A free image viewing program so you can see your
images on your own computer without any additional expense. Not the
best at editing but a good free viewer. |
|
| How to Prepare Digital
Images for 35mm Jury Slides
| A similar page with instructions on preparing
digital images for jury slides and where to have the slides made. |
|
|
Art Show Photography Forum
| A forum we host for photographers doing art shows.
Other mediums are welcome to join and ask questions about
photographing their work for jury slides. Photoshop and Elements
questions are also welcome, as are any art show questions. |
|
|
| Contents of this page,
including all images is copyright Larry Berman I didn't add a copyright
to the actual images because it might be misleading to artists who are
preparing their own images. Art shows are welcome to link to this page, or
even copy the content provided they credit us and link back to
this page or web site. |

